

Post by cecil on Jan 22, 2008 20:17:05 GMT -5
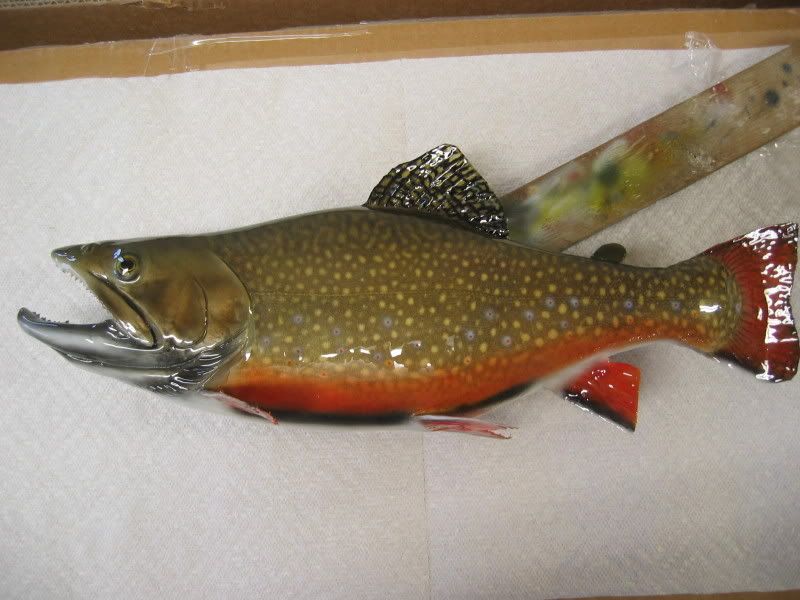
Male Brook Trout
Commericial Brook Trout Paint Schedule (Salvelinus fontinalis)
Note: This paint schedule is not meant to be the only way to paint a brook trout. I have placed it here to help those just starting out, or for others that just want to see someone else's take on painting this species. Be aware they can vary somewhat in color from water body to water body and region to region. Also the time of year has a large bearing on colors.
If you are a beginner you should strive to be able to paint any species just by looking at your reference, and wean yourself away from paint schedules. This may take a little time but can be learned. I hope to add full color pictures for each step sometime soon.
This paint schedule is for a brook trout male as he appears in full spawning colors when harvested in the fall to winter. Females and males that are harvested any other time of year you may want to adjust according to reference, if you prefer to paint them differently. Even females in spawning colors are more subdued than a male in spawning colors.
Attempt to find a good color photo of a brook trout to refer to as you paint. One thing to keep in mind about a brook trout is the fins are quite thick. I would suggest at least three coats of fin coating on a brook trout. For competition work you may even have to fill in areas of shrinkage on brook trout fins with Apoxie Sculpt. Or cast your fins.
After carding the fins they have a tendency to warp due to the thickness of the fins. I counteract this by reinforcing the fin carding during drying with strips of metal file folder hangers.
Step 1.) Seal your fish with 2 flash coats and one medium coat of sealer.
Step 2.) Off White If your cast head is any color other than white or gray, white it out with Off White. Also white out the inside of the mouth of the fish. If you see any imperfections after whiting it out, now is the time to fill with Apoxie Sculpt and make adjustments. Let the Apoxie sculpt dry and then white out your adjustments to match the rest of the head. Sanding may be needed. If you have any darker blotches in the lower ¼ the body in the area where the skin is lighter than the rest of the body, sparingly use a little off white to go over these to match the rest of the light area. Paint the center of the belly of the fish. (bottom of the fish)
Step 3.) Jet Black Very lightly shade in the top of the head down to about the center of the eye to blend in with the back where it meets the head. This should be just dark enough to blend in with the back. Also if you have any areas of the skin above the belly that are lighter than the rest of the skin you can blend those too. Darken you adipose fin if you used an artificial one or you sculpted on in. If you need to blend in any repairs of the outer edge of the caudal fin (tail) you can do so with the black also.
Step 4.) Chrome Pearlescent Use this silver on the gill cover and cheek a little on both sides of the head. This is very important to get a realistic looking head later on when you apply other colors.
Step 5.) Bright Yellow Very carefully and lightly use this color to bring out a little yellow on the back and a green tone down the sides fading it out at the lower ¼ of the body that will be a red/orange color. You should see the original spots on the side of the fish brighten up to a nice yellow if they are not already. Highlighting the yellow spots this way verses painting directly over them looks very natural. It also takes care of two tasks at the same time. You end up highlighting your yellow spots and you also create a green skin tone on the back ground of the fish. The adipose fin should be hit with this along with the dorsal fin. Seal this in with sealer.
Step 6.) White Very lightly make a few small dots spaced out in the appropriate area of the fish to start the setup up for your blue halos with red dots in the center. Use reference.
Step 7.) Chrome Pearlescent mixed with Sailfish Blue: Mix this color until you have a sliver blue color. Spray this carefully directly over your white spots. (The red spot in the center of this will come later in the paint schedule)
Step 8.) Bright Yellow and Gill Red Mix this color until you have a red/orange color for the lower 1/4th of the fish. This color can vary somewhat. Some male brook trout only become yellow in this area but the red/orange is a striking color that really sets off the fish. Using reference shade this color down the side of the fish just above where the charcoal shading will occur. Use reference. Also paint all the ventral fins with this color except for the front of the fins where the white and black border will bee (see reference). The caudal fin gets painted this way also except for the bottom where the white and black border will be.
Step 9.) Sealer Seal your fish again to create a barrier to prevent colors from bleeding through your next colors.
Step 10.) Red Permanent Sharpie Marker Using a red permanent sharpie marker (must be permanent) make a red dot in the center of your blue dots. Some of the yellow spots just above your orange area on the lower sides may also have red spots.
Step 11.).Off white Paint the front edge of all the ventral fins heavily and the bottom edge of your caudal fin (tail). Paint the jaw line of the head and the gill covers. With the fins edges use carding to make a distinct edge.
Step 12.) Rich Brown. I use this color over the chrome pearlescent on the head followed by some black to make some variation. Use reference. You can also use fine steel wool to get some special effects in this area. Go lightly and experiment if you want to try the steel wool. You don't want to take the chrome pearlescent base color off.
Step 13.) Black Paint over the white on the sides of the jaw, the rear edge of the maxillary bone and shade it slightly over the gill cover and cheek. Next add retarder if you need to paint in the black webbing on the top of the back that outlines the vermiculations. Note: if you used enough yellow in step 5 to give this area a yellow tone you will not need to directly individually paint in the yellow vermiculations. The black webbing will clearly define the yellow vermiculations as you already have a yellow background. I prefer not to paint in the yellow vermiculations individually as they tend to appear painted when one does that. Remember your fish will always look better if you use what markings are left on the fish and tone in or shade in your colors.
Continue to use this black to make a black edge just behind the white edge on the ventral fins. Also just above the white edge on the caudal fin (tail) Next turn your air pressure down to about 10 PSI or lower to create a pepper spitting pattern and paint just above the white belly where it meets the red sides. Use reference. An even more effective way to achieve this look is to cut off a flat brush to a stub and dry brush this pattern on. However, you want to practice this on a flat surface before you attempt it on your fish. Black is also airbrushed into the creases of the lower jaw (where the soft tissue meets the jaw) in the mouth (see reference), and at an extreme angle over the branchiostegal rays to created a charcoal effect just on the tops but not in the grooves.
Step 14.) Use you clear coat of choice. I use an automotive clear coat.
For many the brook trout can be intimidating to paint but it's not as difficult as it looks.
 ? Looking for a wayto fix broken fins on already mounted fish...And how to blend the color to match the fish already painted??? need some help please!!!!!